Blister Basics Part 2

One of the first shocking things I learned as a beginning gymnast was that:

  • I was going to get a lot of blisters on my hands;
  • They were going to HURT; and
  • I needed to learn how to take care of them so they wouldn’t be a problem—for my health or my gymnastics participation.


At the beginning—

My eight-year-old hands were tender, unused to the friction and shear forces I was going to expect them to handle for the next fourteen years of my life. Like it or not, they would come with my sport.

So after the first two or three episodes of having areas on the palms of my hands heat up, get fiery red, hot and swollen, before having the skin peeled off, I had to learn to care for my hands.

Coach would laugh when we told him we “had a rip.” As an ex-military guy, it was all in line with toughening up, and he thought it was funny. “Just chalk up and get back up on those bars!” A palm-full of thick calluses was to be my fate, and the fate of every other gymnast I knew.

That was back in the days when female gymnasts didn’t wear the grips they do now. Guys did; girls suffered. They were cumbersome and difficult to use on our oval-shaped bars; and they were also difficult to use if you had stubby fingers like I do—not enough finger sticking out beyond the grips to grad hold. And they didn’t really make them in girls’ sizes. Surprise.


What is a blister, really?

And what causes it?

I learned more than I wanted to know about the physics of blisters. I learned a lot more when I studied and practiced athletic training. Here are some blister-forming facts:


  1. Blisters can be caused by friction, when a tissue encounters friction when it’s rubbed over or against another surface. Like the up-down motion of your heel against the back of your shoe when you’re wearing thin socks, or no socks at all. Rub, rub, rub. Blister.
  2. Deeper blisters are most often the result of shear forces, when the layers of skin are rubbing back and forth on one another.
  3. When the epidermal layer of skin is irritated or damaged by these forces, fluid collects between the epidermis—top layer—and the deeper dermal layer. The fluid usually comes from plasma escaped from the surrounding damaged cells.
  4. The fluid seeps into the pocket and puffs up the top layer of skin.
  5. The fluid is there to bathe the damaged skin layers, protect it, and start the healing process.
  6. Shear force blisters can cause tremendous pain because it causes damage or irritation to surrounding nerves.
  7. Blisters can form under calluses. (These types of blisters can be hard to manage and require careful treatment.)
  8. Having thickened calluses that aren’t managed (like carefully shaving down or kept soft or pliable) can increase your risk of deep blisters, and a lot of pain!
  9. Sweat and warmth—as what happens when your sweaty feet are stuck in a shoe—increase blister formation likelihood.
  10. Blisters can be filled with a variety of fluids, like serum, plasma, blood or pus (indicating a probable infection).
  11. The crushing or pinching of tissue (like I experienced a lot of as a gymnast, when I was swinging around on the bars) can rupture a blood vessel in the dermal layer, which in turn allows blood to seep into the pocket between the layers. There were times we’d leave blood streaks (or skin sections) on the bars when we had a rip.
  12. The body quickly springs into action when a blister forms.
  • At six hours post-blister formation, the blister fluid is usually re-absorbed, and the top layer flattens back down onto the underlying tissue and begins to die. But it serves as a protective cover for the wound beneath it.
  • At 24 hours, new skin layers are already beginning to form.
  • And at 48 hours, new “soft” baby skin can be seen developing over the wound. If the blister is not properly cared for, this new skin can crack and another wound (now exposed) can appear. Then you can have a blister forming underneath a blister, a very painful condition.
  1. Blisters improperly cared for can lead to infections and slowed healing.
  2. How hydrated you are affects blister formation, and how well it heals. Really.


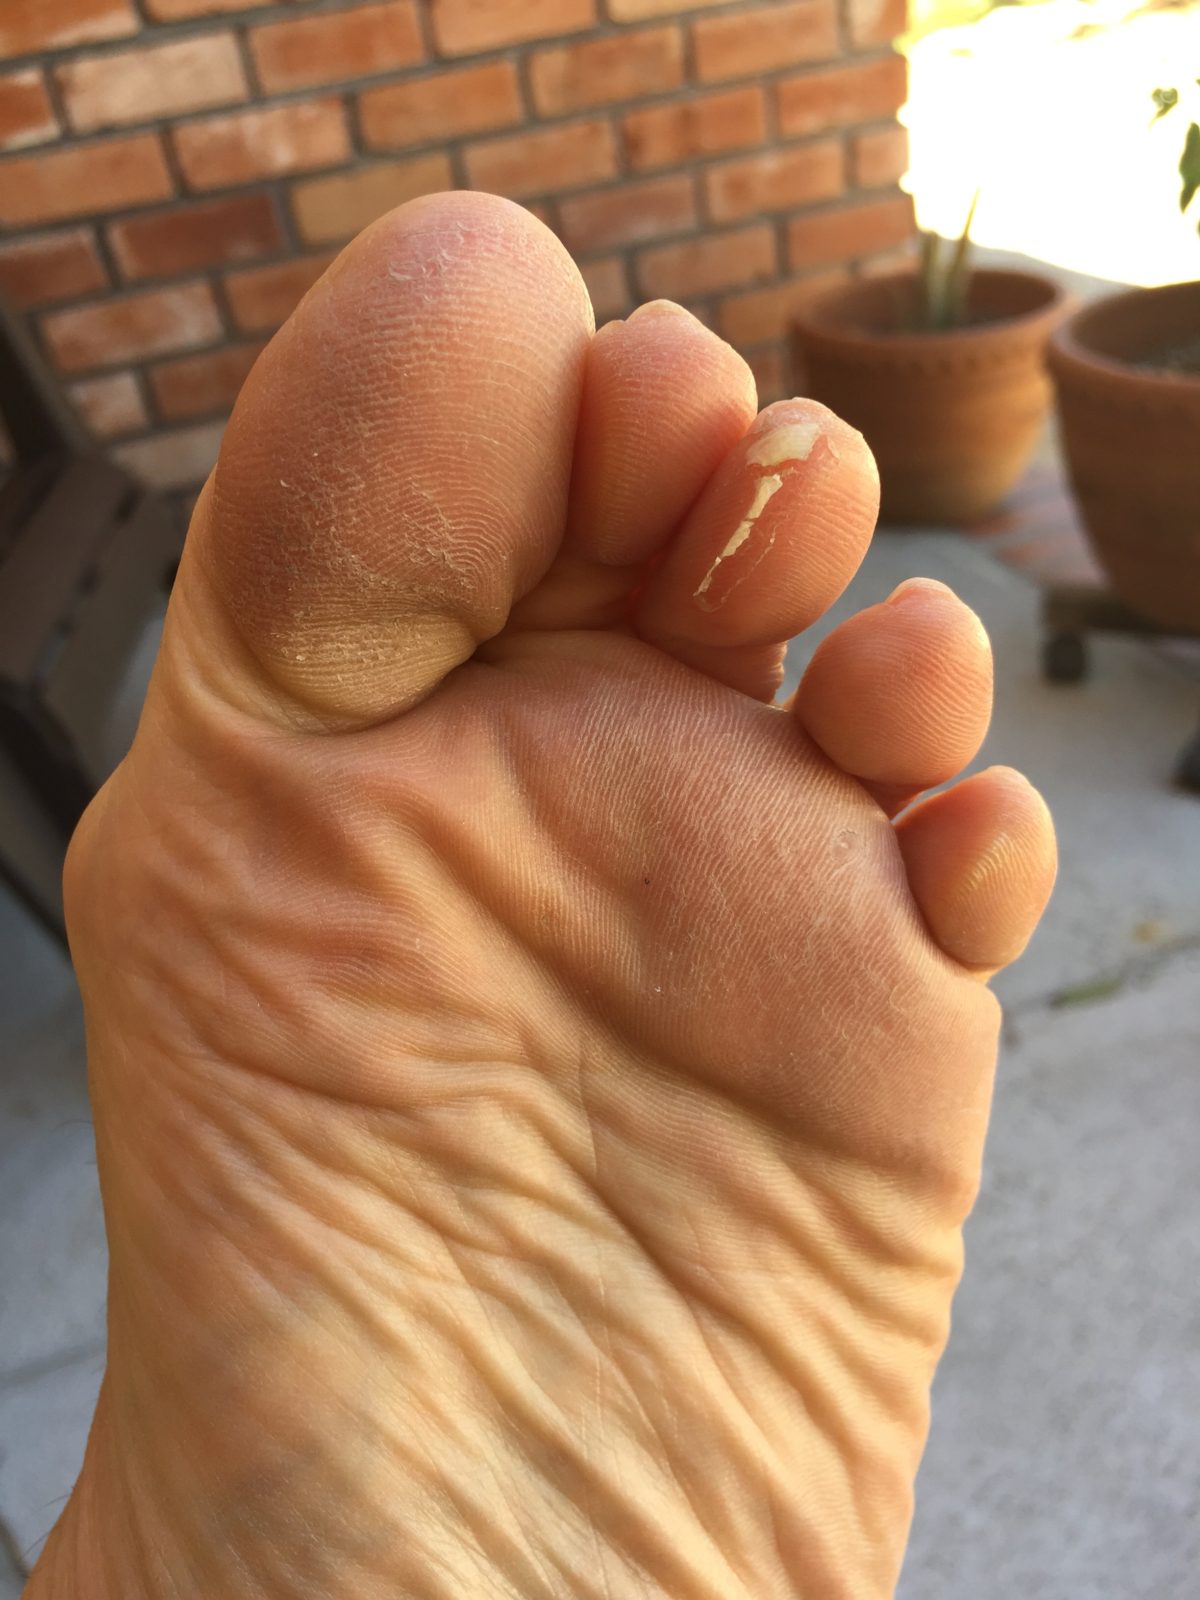
*On the photo above,  you can see the cracked, peeling skin of the blisters that ran along my middle toe. I didn’t do anything to treat those. The body took care of everything, and the old skin is now peeling away. While noticeable, these blisters (which occur in the same spot on both my feet), were not noticeable enough to slow me down, or warrant padding or bandaging. But if I were to go on longer hikes during the day, day-after-day, I would make sure I taped the toes to reduce friction and shear forces. Clearly I am prone to irritation in these areas, probably due to the biomechanics of how my foot hits the ground and pushes off.


NEXT WEEK: Learn how to provide immediate care for your blisters.

Until then, keep those feet dry and as cool as possible! (I know. Difficult on a long walk or hike.) And don’t peel the skin from those blisters!

Blessings,

Andrea

May you prosper in all things and be in health, just as your soul prospers (3 John 2).

Photo by Andrea A Owan

Walking, Running and Hiking Socks—It Pays to Know What’s Available

Been to your neighborhood outdoor recreation store lately to buy socks? The array of choices and purposes can be mind-boggling! What happened to just having a nice, cottonish sock with adequate heal and toe padding, and maybe a gradation of thickness, depending on what kind of weather you’d be hiking or exercising in?

Unfortunately (because you need to do your homework, know your sock choices and try them out), and fortunately (technology advancement in materials means they now make socks for every kind of feet, environment and need), you have a variety to choose from and try. Because your feet, comfort, blister prevention and exercise enjoyment depend on it, it pays to know your options. So let’s do some general studying. You’ll be doing yourself a monumental favor!


Going past the basics to specialty socks—

Walking, Running and Hiking:

In this category, you’ll find socks made for

Moisture Wicking— (and keeping the feet as dry as possible). Especially good for you super-sweaters. Offered in road and trail versions, different heights, and a variety of material blends.

Hiking—high calf or crew, hikers will choose wool or wool blend in different thicknesses, depending on the weather. But make sure if you wear wool you frequently check the sock for fabric clumping. That can cause blister problems.

Sock Liners—Runners, walkers and hikers sometimes wear liners between their woolies and the shoe in order to wick moisture away from the foot and reduce friction (or shear), which reduces your chances of being disabled by blisters from too-moist feet.

When I discovered these babies, I thought I’d nearly died and gone to heaven! They made hiking SOOOO much more enjoyable. One of the things that had turned me off to hiking (aside from the leaden boots that used to be standard fare), was the bulky feeling of the socks inside the boots. (Remember, I spent most of my years as a bare-foot or ped-footed gymnast, so anything heavy on my feet made me miserable.) These liners gave a silky feel to my feet and legs and made getting those SmartWool hiking socks on over my feet a breeze. They also reduced hot spots and blisters, and wick moisture from your feet, so I was immediately sold. I wear them under my ski socks, too.

I swear by sock liners when I’m wearing hiking boots! If you’re on a long trek, with an overnight stay, it cuts down on the amount of outer sock washing. Washing the thin liners is quick and easy, and if it’s during the summer, they usually dry overnight, or you just clothespin them to your backpack the following day to hang dry as you’re walking. Always carry at least two pair of liners with you for this. They’re light and compact enough to stuff in your backpack without taking up too much room. (Of course, discount the hang-to-dry part if you’re knee-deep in snow during the winter.)

Double-layered Socks—These are now my go-to socks! I love, Love, LOVE theme! A REI associate recommended them to me while I was shopping at their Seattle flagship store. They’re ankle height and are SOOOO comfy! I’m planning to wear these on our pilgrimage, even in cold weather. I’ll have lightweight, ankle gaters on to keep the pebbles and dirt out, and if it’s really cold, I’ve got lightweight silk long underwear. And maybe I’ll wear an additional pair of sock liners underneath the double-layered models.


Is that overkill? Not for me, personally. Triple layers help some people tremendously. For some, they might not like that additional layer. You need to find out what works for you.


Compression Socks—I’ve heard both pros and cons on these. One runner wrote a long article disparaging these socks and giving his reasons why. Research hasn’t drawn a positive conclusion on them, but as some experts state (and I would agree), if they make you feel better and don’t cause any harm, go for it! (One of my doctors personally swears by wearing them on long plane flights so combat circulatory problems.)

Some of the stated benefits include: improved circulation, reduced swelling, increased comfort, improved maximal oxygen consumption, quicker recovery, and reduced leg fatigue. Some people wear them strictly to enhance recovery, so their feet will be perky enough to put in mileage day-after-day.


But beware of wearing compression socks in the heat! You may set yourself up for heat rash (I’m prone to this, with horrible red splotches popping up at the top of the sock and about two inches beyond that.) You don’t want to stress your circulatory system!


Other options—

 No socks—Then there’s the sockless aficionados. This used to be more of a problem when athletic shoe insoles couldn’t be removed. Then your foot sweat seeped into the insole/liner, which caused the insole to stiffen and lose its support capabilities. But some of my athletes at Indiana University (many whom were national champions, Olympic Trial competitors, or went on to be Olympians) loved the no sock feel. With all of the nerve endings in the feet and toes, it helped them feel the ground more. Their shoes were incredibly stinky, though! And stiff from all of the sweat salts.


Know how to put on a sock?

Yes, there is a right and wrong way to put a sock on your foot.

  1. First, turn them inside out to make sure they’re pebble or dirt or pile-free. Then turn them back.
  2. Then, roll the ankle portion down to the toe area as far as possible.
  3. Slide the sock over your toes and carefully work the sock up your foot, ankle and calf.
  4. Make sure any seams are not directly over your big or little toes, to rub on these appendages when the shoe is on and cause problems.
  5. Smooth and straighten the sock out.
  6. Put your shoe on and make sure the socks are situated on your foot in a comfortable manner.
  7. Lace up your shoes and have at it!
  8. Take the time to remove your shoe and sock during your walk or hike, if you must. It’s common to get little pebbles, dirt and dust in your shoes and socks that create friction problems. Clean them out, and start again. Your feet might enjoy the fresh air! J


Wearing gaters helps alleviate the dirt and pebble problems.


WARNING!If you do elect to wear layer upon layer of socks, go up at least a ½ size in your hiking boots or shoes. You don’t want that puffy, padded sock to get squashed (so long cushy padding!) or make the fit so tight your foot is screaming in pain! And make sure you try the socks on with the pair of shoes/boots you want to buy, while you’re in the store!


Advice you might want to consider, or not—

A friend of mine who walks the Camino de Santiago nearly every year suggests buying a boot or shoe a size to a size-and-a-half larger, to allow for your feet to swell on lengthy mileage days. But I wouldn’t do that. With shoes that much larger, your feet will slop around in them at the beginning of your walk/hike, and you’ll increase the friction and shear forces assaulting your feet. The result? Instability and increased hot spots and blister formation. He also tells people they will definitely get blisters, which might be because of this shoe way-too-large shoe practice.

But your feet will swell, and there is a remedy for that.


Train, train, and train some more!

There’s no substitute for putting in the mileage ahead of time during training, so your feet will widen and toughen up and be prepared for the mileage you’ll be walking. Or you can consider buying larger shoes as you progress on your hike. Evidently some thru-hikers have been known to do this when walking the Appalachian and Pacific Coast Trails—ordering larger sizes to be shipped ahead to a pickup location or actually leaving the trail to shop at suppliers stationed along the route.


Wanna avoid wet feet in rain and are too cheap to buy moisture-wicking socks or expensive rain gear?

As athletic trainers at the University of Wisconsin, (where I was an undergraduate student trainer), it wasn’t unusual for us to be subjected to standing water on the non-draining AstroTurf during spring football training. That was something our cute little white nylon Nike tennies with the red swish couldn’t handle. Porous, they were!

So, rather than tough it out and risk getting sick from standing around for hours (in the cold, wet weather, under the stadium lights) in soaked feet, another female athletic trainer and I started the following uniform craze:


  • Put sock on.
  • Put sock-covered foot into a plastic sandwich baggy.
  • Liberally wrap the top of the baggy (around the ankle) with white athletic tape to create a halfway decent seal and secure the baggy to the sock.
  • Put baggy and sock-covered foot into your stylish red-swish Nike.
  • Walk out to the football field and pad up-and-down the sidelines while the team practices.
  • Squish back to the training room after three hours, remove the shoe, tape, baggy and sock and put on dry shoes.
  • Clean the dirt and mud from your Nikes, air them out overnight, and do it all again the following day.
  • Voila! Dry feet (that didn’t freeze or look like prunes)!


Ultramarathon runner John Vonhof says you can do this with recycled bread bags. Haven’t tried that one myself, but it might be worth it to carry a couple of recycled bags along on my pilgrimage. In case I encounter a deluge!


NEXT WEEK: Preventing and treating foot blisters.

Until then, have fun trying new socks, and enjoying your walk and hike more!

Blessings,

Andrea

May you prosper in all things and be in health, just as your soul prospers (3 John 2).

Photo by Andrea A Owan