3 Reasons Why Everyone (Especially Women) Should Use Hiking or Nordic Poles for Trekking or Fitness!

I’m not going to need to use hiking poles until I’m old! That was my thinking, although I wouldn’t have been able to define what “old” was when those thoughts crossed my mind five years ago.

Then I read an article by a guy who writes for a hiking magazine. A young guy, late twenties or early thirties. He thought hiking poles were for wimps or decrepits, too, until he caved in to a friend’s advice and used them to hike the Kalalau Trail on Hawaii’s island of Kauai. He was an instant convert. In the article, he noted how the poles reduced the load on his knees and made the trek easier and more enjoyable. I could relate. Our family hiked part of the Kalaulua Trail a couple of years earlier, and the return trip was murder, for all of us, including the high school and college kids.

I mentioned the article to my older son—25 at the time—who is an avid hiker. He said, “You, know, I would have said the same thing, until I got my poles. (He got poles?!) And now I use them whenever I’m out hiking. They make a huge difference. Lyndsey (his then fiancée, now wife) loves them.”

“Hmmm, maybe I should get some.” As soon as I voiced that thought, he offered to buy a pair for me for my birthday, and I told him that’s a great present! (Which it is!)

So, I got my poles and have rarely walked even our neighborhood since then without at least one in my hand. And then my younger son got me some spiffy ergonomic models from England last year for Christmas. A Camino alumni highly recommended them. I used mine on our Camino last month, and they saved my legs (and maybe my entire body) on more than one occasion. Chris used his poles too. A couple of years ago I bought a pair for him like the kind Parker had given me.

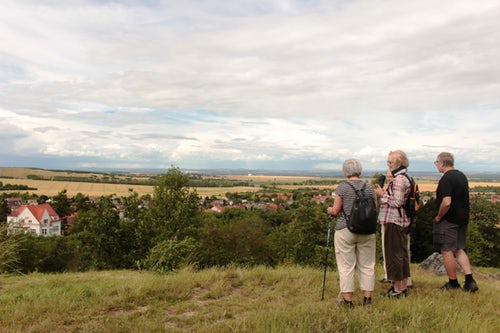
People have stopped me on hikes around Tucson to ask about my poles and why I use them. After the conversations they’re excited about buying a pair for themselves.

Why do I recommend hiking poles foreveryone? I’ll give you my reasons.


3 reasons all hikers (especially women over 50 years) should use hiking poles:

  1. The number reason, hands down.

They save your knees!

When you’re trudging uphill, you can lean on them to reduce the load from your legs and knees. When you’re going downhill, you can do the same. And the downhill is probably the most significant. Negative loading, which happens when you’re going downhill, stresses the muscles and tears up the joints faster than uphill work. (Unless, of course, you’re climbing over big boulders.)

When going downhill, I’ve actually planted my poles (checking to make sure they’re secure in the terrain) and hopped or swung myself over precarious rocks or steps in the trail. I’m not swinging around like a monkey; just taking short swings over obstacles I might risk falling over.

The rocky incline we had to descend the second day into our Camino last month was brutal and could have been excruciating on the knees. Actually, without the poles I think my knees would have called it quits long before I needed them to. Even with my poles, my knees complained. But I was able to use the poles as supports, like ski poles, as I walked sideways and zigzagged down the mountain, almost as a skier might telemark. I was able to move quickly, without as much risk of slipping or falling, which would have been disastrous on the sharp rocks.

Chris commented that in the first two days of walking the Camino he had never leaned on his poles so hard. At times we were bent over close to 45 degrees on the inclines. If you’re expecting your thighs and knees and ankles and feet to sustain that load without some help, you’re going to quickly regret that thought.


  1. Hiking poles help you maintain your balance.

Walking or hiking with poles is a little like having an extra pair of legs. I was amazed at the number of pilgrims walking without poles; and I was just as amazed by the pilgrims who had poles they dragged along the ground behind them. If they didn’t want to use them, they could have shortened them and stowed them in their backpack. But maybe they weren’t in-the-know on how to properly use them. Or they were so exhausted they couldn’t lift their arms.

As long as you’re not leaning on them while walking on a flat surface, poles help you maintain your center of gravity. That’s good for your biomechanics.

And when walking downhill, you lean forward and use your poles like outriggers. This keeps you from leaning backward, which places a tremendous amount of stress on both the knees and low back!


  1. Getting your arms involved gives you more of a full body workout.

Using poles helps strengthen your arms!(Hey, ladies, are you paying attention?) Planting your poles and pulling and pushing with them works both the biceps and triceps, and that means (drum rolllll!) the flappy arms disappear! They’ll be thinner, tighter and better defined. Getting excited about hiking with poles now?)

And getting your arms involved is great for your heart! Upper body exercises get your heart rate moving faster sooner since they’re closer to your heart than your legs.

Using poles also gets the core and abdominals involved, so they’re more likely to get whittled down and tightened up too.

But you have to know how to use them properly and practice with them. Some people aren’t as coordinated as they need to be to use poles efficiently. I’ve provided a couple of YouTube videos to help you get started. (I don’t make anything from referring you to these videos or products.)


Knowhow—

Rick Deutsch uses Nordic walking poles for an everyday fitness program. The poles he recommends are not for hiking, but they—and the techniques he covers in her video—will give you a great workout. Evidently it’s all the rage in Europe. Deutsch says using poles engages 90% of your body rather than just 70% without any poles.

Heather Rhodes, the physical therapist in the second video, is the developer of Pacer Poles and has an entirely different method for the proper use of poles. What you choose will have to do with your fitness goals, activity, and physical limitations.

Go to the Pacer Pole website to learn more about how to use your poles in walking and hiking situations.

And for those of you hardcore types that want to train for a real tough climb, see this REI video on training to climb a 14er, any mountain meeting or exceeding 14,000 feet in elevation. Their training program is awesome!


Either way, get yourself a pair of poles and starting moving!


NEXT WEEK we’ll have a short discussion on another technique to help you navigate hills—up and down—with less difficulty.

Blessings,

Andrea

May you prosper in all things and be in health, just as your soul prospers (3 John 2).

Photo by Andrea A Owan

Blister Care Basics: Prevention

One of an athletic trainer’s responsibilities is evaluating injuries and developing treatment plans for and overseeing an athlete’s recovery from an injury. Many people don’t know that we’re considered first responders and are often the first—and perhaps only—medical personnel on the field when an athlete suffers an injury. Through our extensive training, we can often tell what kind of injury an athlete has suffered just by witnessing the mechanism of injury—like the angle and forces involved immediately prior to the injury’s occurrence.

But another one of our responsibilities is helping the athlete stay healthy and well and avoid injuries. That’s often a difficult thing to do when you’re working with highly competitive athletes, or coaches who push their team participants beyond normal limits.


The old adage “an ounce of prevention is worth a pound of cure” is true!


Preventing blisters—

If you’ve ever had a big blister on your heal, foot or hand, you know how debilitating it can be. A big bad one can negatively affect your performance. For walkers, hikers and runners, there are some proactive steps you can take to prevent blisters, before they materialize.


 Blister prevention steps:

  1. Always make sure you’re wearing clean socks. Dirt and grit can act on your foot like a grain of sand affects the inside of an oyster. While an oyster makes a beautiful pearl, our bodies will develop hot spots and blisters. Remove your socks after every wear, shake out the grit and wash them inside out. Consider changing them in the middle of your event, especially if you’re the sweaty-feet type.
  2. If your feet tend to sweat a lot, consider wearing moisture-wicking socks. They’re thick, and sometimes feel a bit stiff on the outside, but they can help you avoid damp spots and skin maceration, like you get when you’ve been in a swimming pool or bath too long.
  3. Wear double-layered socks. This by far has been the most important piece of equipment in my hiking regimen. They reduce the friction and shear forces and add some extra padding and comfort.
  4. Wear a thin sock liner, even if you wear double-layered socks. The sock liner also helps wick moisture away from the foot to keep it dry and less prone to hot spots.

Wear comfortable shoes that are neither too tight nor too big.

  1. Use a skin/foot lubricant that reduces friction, or a powder that absorbs moisture. Lightly apply the lubricant to the areas on your feet that are prone to hot spots—like toes, balls of your feet, or heals. Know your feet and what they need. Each of my feet seems to have different needs and idiosyncrasies, so I treat them both a little differently. I tape the ball of my right foot and my ankle on my left. Two toes on each foot get taped to prevent blisters. Sometimes my left foot (on the outside) gets supportive tape since I sprained the ligaments in that area trying to adjust my foot in my old road shoes during the course of my walking. Dumb idea that has cost me hiking comfort and lots of money in tape.

Is a bigger shoe better during a multi-day event? I am not a proponent of buying bigger shoes than fit your feet at the start of a long, multi-day hike or walk in expectation that your feet will swell so much they’ll eventually fit in the shoe. A shoe that doesn’t fit you well (too small or too large) will give you major problems.

First, the anatomical shape of the shoe does not conform to or support the anatomical shape of your foot. Big problem. And your foot will be sliding forward in the shoe with each step, with your toes repeatedly smacking up against the end of the toe box. Friction, friction, friction! And toe bruising. Not good.

  1. Make sure the inside of your shoes are debris-free. Remove the insoles after every walk, run or hike, check them for grit and little stones or pebbles and shake out your shoes. Let the insoles dry out. Keep an eye on the insoles to see if they’re breaking down. You may need to replace them with over-the-counter insoles from your local pharmacy store.
  2. Consider wearing gaiters that cover your ankles and shoes. They go a long way in keeping dirt out. Both REI and OR (Outdoor Research) carry some great gaiter products. (I personally wear OR’s Surge Running Gaiters, which I purchased at REI.)
  3. If you do notice a rock has sneaked into your shoe while you’re walking, STOP, remove the shoe and shake out the offending rock. If you don’t you’ll set yourself up for either a blister or irritation developing, or a ligament sprain or muscle strain from throwing your gait off to compensate for the rock. Really.
  4. Likewise, if you notice you’re developing a hot spot, and it’s beginning to tell you you’ve got a problem, STOP, remove your shoes and socks, inspect your foot to see what’s going on, dry your foot off, (if necessary), and tape it up. Do not add more lubricant unless you’ve removed the first layer with an alcohol pad. Adding lubricant on lubricant can make the problem worse.
  5. Keep your feet clean! Make sure you’re not putting clean socks on dirty feet.
  6. If you don’t treat your feet to pedicures, make sure you know how to care for them yourself. Carry clippers, pedicure scissors and a strong nail file with you on your multi-day events.
  7. Keep yourself well hydrated with water and electrolytes. Many professionals think this can significantly reduce blister formation. (There are biological reasons that support this thinking.)
  8. BREAK IN YOUR NEW PAIR OF SHOES! Don’t buy a new pair of shoes and promptly run out and put the same mileage on them that you did on your old pair. Break them in slowly. Don’t assume your new pair—even if it’s the same brand and style—will be made exactly like the last pair. Your feet (which were used to the older pair’s laxity) will be shocked by the stiffness of the new pair. Keep your feet happy!
  9. Keep your toenails properly trimmed and cuticles cared for. Using a cuticle clipper, remove any loose, snagged skin. Using a pedicure file, file down the calluses on your heals. Go lightly with the file around your toes. (Many walkers, runners and hikers like the callus buildup around their big toes because it tends to add some protection. HOWEVER, if the callus is too thick, it can cause increased shear forces that promote blister formation beneath the callus. That’s a painful, difficult blister to care for.)
  10. Make sure you dry your feet well after showering and then lotion them up before bed. You might want to put socks on them after the lotion to aid lotion penetration.

As a gymnast, I filed down my thick calluses with an electric pedicure appliance, slathered lotion on my hands and slept with socks on them. Really. It worked wonders for keeping my hands in good condition—not too soft and not blister or rip-prone. It was common for us to get blisters beneath our calluses, blisters that filled up with blood, so caring for our hands was a must. (We also broke and drained blisters in horrible, unsterile conditions, with chalk on our hands, so we could continue to train.)


Proper training goes a long way!

  1. So many of the foot problems I see (and also encounter in myself) is improper training. One of the most problematic is improper training, or doing too many miles too quickly on poorly conditioned feet. And sore feet will alter your gait enough to cause a chain reaction of problems from your toes to your neck. So take this warning seriously!


The training rule of thumb is:

Train in an environment as close to replicating what you’ll be walking, running or hiking during the expected event. If this means wearing a backpack, train with the pack. Your feet will notice a difference.

When setting your goals, work with one variable at a time. Either increase your mileage OR (did I say OR?) increase your speed/pace, but DO NOT increase both simultaneously. And increase either of these by no more than 10% at a time. If you walk 3 miles one week and feel as though you can increase your mileage, then walk 3.3 miles the following week, at least three times a week, until you feel comfortable at that distance. Or reduce the amount of time it takes you to walk that 3 miles by 10% and do that three times a week until comfortable.

Violating this training rule is probably the biggest cause of injuries that end up being difficult to treat and end up being chronic. Better to go slowly than end up being sidelined and having to start over.


What about swollen feet?

If your feet do get swollen, there are several reasons why that may be happening.

  1. You violated the 10% training rule outlined above.
  2. You didn’t stay well hydrated or consume enough electrolytes.
  3. Your shoes don’t fit properly.
  4. You have anatomical issues with your feet (like high, rigid arches or flat feet) that make you prone to foot problems, like a dropped metatarsal head, clawed toes, or plantar fascitis.
  5. You’re wearing the wrong shoe for the activity or surface, or one that doesn’t give you the proper support you need.
  6. You walk on hard, unforgiving surfaces rather than mixing it up with more pliable ones.
  7. You have a vascular (or other medical) problem that inhibits good venous return to the heart.


Alternating shoes may help—

Something else you should consider is switching shoes during your multi-day activity. Carrying two pairs of shoes (different styles) helps in several ways:

  1. Giving your shoes a day-break allows them to air out and regain some of their resiliency and form.
  2. Putting on a different pair (and somewhat different style) of shoes the following day can help alleviate some of the stresses put on the foot from the previous shoe shape and balance. I like to switch between my more supportive road/trail combination shoes and my strictly trail shoes. The trail shoes should get me 1,000 to 1,500 miles, while the road shoes may last 350 to 500. But I’m hard on shoes, so I plan for half this number. Mixing it up helps my shoes last longer. (Be careful with this, though. Sometimes it backfires and causes more problems.)


Consider using hiking poles—

Several years ago I would have turned up my nose at the suggestion of using hiking poles, believing they were for wimps, older people who had balance problems, or for those wanting to stab some aggressive dog ambushing them during their neighborhood sojourn.

Not so any longer! I wouldn’t walk or hike anywhere now without my beloved poles. And I have two pair of different styled poles. They go a long way in taking the load off your feet (and knees) while hiking or climbing around rocks.


It’s been a long, info-packed post today. While it hasn’t been exhaustive in scope, I hope you’ve gained at least one tidbit to help you stay on your feet, keep moving and avoiding blisters and maybe some foot (or joint) injuries.


 NEXT WEEK I’ll give you my list of personal prevention and treatment items I’ll be taking with me on my pilgrimage. It was a hard decision since I’m limited in space. Come back next week and see what a sports medicine pro carries in her own multi-day hiking pack!

Until then, enjoy the outdoors—safely!

Blessings,

Andrea

May you prosper in all things and be in health, just as your soul prospers (3 John 2).